SW20 DISTRIBUTOR REBUILD PROCEDURE
![]()
|
|
|
The 1989+ 3S-GE and 3S-GTE distributor is a relatively simple unit. It is used in all of the post 1989 3S-GE and 3S-GTE motors meaning spare ones are not too hard to come by. |

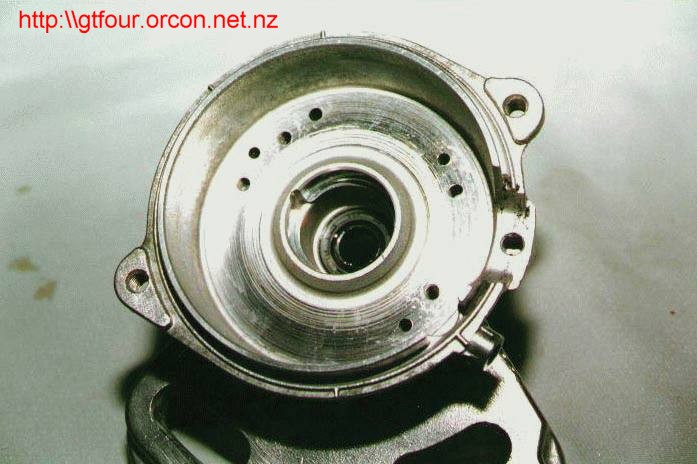
There are three coil pickups (G1, G2 and G-), which are all incorporated into one plastic assembly making alignment very easy. Unfortunately the internals can be damaged by rough handling and overheating. Contained within the plastic retainer are two brittle magnets which can fracture, interfering with the signal pickups. However the most common failure of the distributor is a leaking inner lip seal. The bearing also often has noticeable play, even at only 50000kms (the approximate mileage of the distributor in the photos). The bearing is sealed and not lubricated by the engine oil.
As seen from the photos there are few parts to the distributor and it can be easily disassembled. However if you try to purchase any of these parts individually from Toyota they will kindly advise you that the distributor is only available as an assembly - to the tune of several hundred bucks...
However the leaky seal, leaky outer o-ring and loose bearing can be replaced for about ten dollars as they are all standard metric sizes and hence available from any bearing supplier. The only tools required to replace them are a phillips screwdriver, a 3mm pin punch, a 5mm pin punch, a 20mm plastic drift and a big hammer. A hydraulic press is handy but not necessary.
DISASSEMBLY
-Remove distributor cap, seal and rotor.
-Mark the rotor and drive fitting so you know which way round they go when you assembly them!
-Clamp the cam drive tightly in a vice (using soft jaws) and drive the dowel pin out with a pin punch and hammer.
-Measure and record the length of the shaft protruding from the aluminium body.
-With the cam drive off unscrew the four screws holding the pickup retainer to the distributor body. Where it is bonded to the body make sure the RTV seal is carefully broken.
-Clamp the distributor mounting flange in a vice and tap out the rotor shaft. If necessary use a pin punch to drive it all the way out. Remove the rotor and sensor retainer.
-Place the distributor face down and knock out the bearing using a pin punch. Then tap out the seal which will be quite tight. You'll destroy it but don't worry, however be careful not to damage the housing.
ASSEMBLY
-Wipe the inside of the body then inspect the seal and bearing bores in the aluminium housings for damage.
|
|
|
-Oil the bore of the new seal (maybe with a touch of grease?) and tap it into place with the hammer and 20mm drift. Seat it into the housing (see photo). If you can't read the details on it once installed you've put it in backwards... |
-The bearing in the distributor I rebuilt was a press fit into the housing. You could hammer it in with a drift but I used a hydraulic press. Apply pressure to the outer race only when installing, not the inner.
-Screw the plastic sensor retainer into place after applying RTV to the underside of the plug.
-Insert the rotor shaft dry and press or hammer it in. The even pressure of a press is preferable. Press it through until it extends the amount measured previously, being very careful that the rotor teeth do not press down onto the sensor pickups.
-Loosen the sensor retainer screws and realign the retainer to ensure all three sensor gaps are equal. Retighten the screws.
-Fit the cam drive to the shaft and align your marks. Press the dowel pin through using the vice as a clamp.
-Replace the body o-ring and cap seal.
-Fit the rotor and cap and you're done!
-Put some oil into the
shaft oil holes and work it in.
UPDATE October 2007
I have changed the lip seal
part number in the list below as the seal I had used leaked. The temperatures
inside the dizzy are higher than thought and therefore a high temp seal is
needed. These are a rusty colour.
PARTS
|
Bearing |
26 x 10 x 8mm - SKF 6000-2RS, NTN 6000 LLU/2A or KOYO 6000RS |
|
Lip seal |
20 x 10 x
7mm - |
|
O-ring |
Toyota P/N 90099-14090 (bastards now want $10 for it!) |
![]()
![]() Back
to Technical Notes Page.
Back
to Technical Notes Page.
![]() Back
to Home Page.
Back
to Home Page.
![]()